เมนู

วันอังคารที่ 25 ตุลาคม พ.ศ. 2559

Pinguino กับ ADC บน Multifunction Shield


               ในบทความนี้จะเป็นการทดลองอ่านค่าแรงดันตกคร่อมตัวต้านทานปรับค่าได้( POT ) บน Multifunction Shield ผ่านทาง Analog to Digital module ใน PIC18F45K50 แล้วนำค่ามาแสดงผลบน 7-segment โดยแบ่งเป็น 2 โปรแกรม อันแรกจะแสดงค่าตัวแรกจาก 0 - 1023 (ความละเอียด 10-bit, (2^10) - 1 = 1023) ส่วนโปรแกรมที่สอง จะนำค่าที่อ่านได้มาคำนวนกลับเป็นแรงดันตกคร่อมตัว POT แล้วแสดงผลบน 7-segment

รูปที่ 1 POT ของ Multifunction Shield

               จาก schematic ของ multifunction shield จะเห็นว่าตัว POT จะต่ออยู่กับอินพุต AN0 ดังนั้นเราจึงสามารถเรียกใช้ฟังก์ชัน analogRead() เพื่ออ่านค่าแรงดันตกคร่อมที่ขา AN0 ได้เลย โดยค่าที่ได้จะมีค่าระหว่าง 0- 1023
               ในส่วนของการแสดงผลบน 7-segment สามารถย้อนกลับไปดูรายละเอียดได้ในบทความที่ผ่านมาโดยกดที่ลิ้งค์ต่อไปนี้ได้ครับ
pinguino-7-segment-multifunction-shield

               ในส่วนเริ่มต้นจะมีการประกาศตัวแปรที่จะใช้งานในโปรแกรมของเรากันครับ
ตัวแปรอาเรย์ Dis_table[] จะเก็บค่าตัวเลข 0-9 ที่จะแสดงผลบน 7-segment ส่วนตัวแปร Dis_buf[] จะเก็บค่าที่จะ enable เลขแต่ละหลักให้ติดสว่างเอาไว้  โดยทั้งสองตัวแปรนั้นในระหว่างใช้งานไม่ได้มีการเปลี่ยนแปลงค่าดังนั้นเราสามารถประกาศเป็น const เพื่อที่ compiler จะได้เก็บค่าตัวแปรทั้งสองนี้ใน Flash memory จะได้ประหยัด RAM อันมีค่าของเราด้วย
              ส่วนตัวแปร disbuff[] นั้นจะเอาไว้เก็บค่าตัวเลขแต่ละหลักหลังจากที่ได้ decode ออกมาแล้ว และเตรียมพร้อมที่จะแสดงผล

1:  const unsigned char Dis_table[] = {0xC0,0xF9,0xA4,0xB0,0x99,0x92,0x82,0xF8,0X80,0X90};     // ค่าตัวเลขที่ใช้แสดงใน 7 segment  
2:  const unsigned char Dis_buf[]  = {0xF1,0xF2,0xF4,0xF8};                   // ตำแหน่งของ 7 segment ที่ต้องการแสดง  
3:  unsigned char disbuff[] = {0, 0, 0, 0};   

ฟังก์ชัน display() เป็นฟังก์ชันที่จะแสดงตัวเลขที่เก็บอยู่ในตัวแปร disbuff[] ขึ้นไปแสดงผลบน 7-segment

1:  void display()  
2:  {  
3:    char i;  
4:   for(i=0; i<=3; i++)  
5:   {  
6:    digitalWrite(LATCH_DIO,LOW);                                  // เคลียร์ค่าตัวเลข  
7:    shiftOut(DATA_DIO, CLK_DIO, MSBFIRST, Dis_table[disbuff[i]]); // ตัวเลขที่จะแสดง  
8:    shiftOut(DATA_DIO, CLK_DIO, MSBFIRST, Dis_buf[i] );           // ตำแหน่งที่จะแสดง       
9:    digitalWrite(LATCH_DIO,HIGH);                                 // แสดงค่าตัวเลข    
10:   delay(2);                      
11:   }   
12:  }  

โค้ดในส่วน setup() จะเป็นดังนี้ครับ

1:  void setup() {  
2:   pinMode(LATCH_DIO,OUTPUT);  
3:   pinMode(CLK_DIO,OUTPUT);  
4:   pinMode(DATA_DIO,OUTPUT);   
5:   pinMode(25,INPUT);    //turn off buzzer first  
6:  }  

ในฟังก์ชัน loop() จะมีตัวแปรโลคอลชื่อ SUM รับค่าจากฟังก์ชัน analogRead() จากนั้นเราจึงนำมา decode เพื่อแยกตัวเลขแต่ละหลักไปเก็บไว้ในตัวแปร disbuff[] ท้ายสุดจึงเป็นการเรียกฟังกชัน display ให้นำค่าตัวเลขนั้นไปแสดงผล

1:  void loop() {  
2:    uint16_t SUM;  
3:    SUM=analogRead(POT);          //อ่านค่าจาก POT(AN0) 
4:    disbuff[0]=SUM/1000;          // คำนวณค่าที่จะแสดงในหลักพัน  
5:    disbuff[1]=SUM%1000/100;      // คำนวณค่าที่จะแสดงในหลักร้อย  
6:    disbuff[2]=SUM%100/10;        // คำนวณค่าที่จะแสดงในหลักสิบ  
7:    disbuff[3]=SUM%10;            // คำนวณค่าที่จะแสดงในหลักหน่วย  
8:    display();  
9:  }  

โค้ดตัวเต็มของโปรแกรมแรกครับ

1:  /*-----------------------------------------------------  
2:  Author: --<Ekkachai Muangrodpai>  
3:  Date: 2016-10-25  
4:  Description: Read the voltage drop on POT of Multifunction shield, then   
5:           Display on 7-Segment.  
6:  -----------------------------------------------------*/  
7:  /* Define shift register pins used for seven segment display */  
8:  #define LATCH_DIO   24  
9:  #define CLK_DIO     16  
10:  #define DATA_DIO    5  
11:  #define POT   A0  
12:  const unsigned char Dis_table[] = {0xC0,0xF9,0xA4,0xB0,0x99,0x92,0x82,0xF8,0X80,0X90};     // ค่าตัวเลขที่ใช้แสดงใน 7 segment  
13:  const unsigned char Dis_buf[]  = {0xF1,0xF2,0xF4,0xF8};                   // ตำแหน่งของ 7 segment ที่ต้องการแสดง  
14:  unsigned char disbuff[] = {0, 0, 0, 0};  
15:  void setup() {  
16:   pinMode(LATCH_DIO,OUTPUT);  
17:   pinMode(CLK_DIO,OUTPUT);  
18:   pinMode(DATA_DIO,OUTPUT);   
19:   pinMode(25,INPUT);    //turn off buzzer first  
20:  }  
21:  void display()  
22:  {  
23:    char i;  
24:   for(i=0; i<=3; i++)  
25:   {  
26:    digitalWrite(LATCH_DIO,LOW);                         // เคลียร์ค่าตัวเลข  
27:    shiftOut(DATA_DIO, CLK_DIO, MSBFIRST, Dis_table[disbuff[i]]); // ตัวเลขที่จะแสดง  
28:    shiftOut(DATA_DIO, CLK_DIO, MSBFIRST, Dis_buf[i] );        // ตำแหน่งที่จะแสดง       
29:    digitalWrite(LATCH_DIO,HIGH);                        // แสดงค่าตัวเลข    
30:    delay(2);                      
31:   }   
32:  }  
33:  void loop() {  
34:    uint16_t SUM;  
35:    SUM=analogRead(POT);          //อ่านค่าจาก POT(AN0)  
36:    disbuff[0]=SUM/1000;          // คำนวณค่าที่จะแสดงในหลักพัน  
37:    disbuff[1]=SUM%1000/100;     // คำนวณค่าที่จะแสดงในหลักร้อย  
38:    disbuff[2]=SUM%100/10;     // คำนวณค่าที่จะแสดงในหลักสิบ  
39:    disbuff[3]=SUM%10;          // คำนวณค่าที่จะแสดงในหลักหน่วย  
40:    display();  
41:  }  


               โปรแกรมที่ 2 นั้นจะคล้ายกับโปรแกรมแรก เพียงแต่หลังจากที่อ่านค่า ADC เข้ามาแล้วนั้นก่อนที่จะแสดงผล เราจะนำค่าที่ได้มาเข้าสมการเพื่อคำนวณกลับไปเป็นแรงดันตกคร่อมซะก่อน แล้วจึงนำไปแสดงผลบน 7-segment
               โดยค่าที่อ่านเข้ามาได้จะนำมาเข้าสมการดังนี้ (ADCread * 5)/1023 โดยเลข 5 คือแรงดันสูงสุดที่ 5 V. และ 1023 คือ (2^10 - 1 = 1023) ครับ แต่คราวนี้ค่าที่ได้จะเป็นเลขทศนิยมหรือ floating poing ซึ่ง mcu จะใช้ทรัพยากร เวลา และ พลังงานมากในการคำนวณ ดังนั้นเราจะทำการปรับซักเล็กน้อยให้การคำนวณเป็นเลขจำนวนเต็ม ซึ่งเราต้องการให้แสดงตัวเลขหลังจุดทศนิยมเพียง 2 ตำแหน่งเท่านั้น ดังนั้นเราสามารถตัวเลข 5 ไปทางซ้าย 2 หลัก จะได้เป็น (ADCread * 500)/1023 ผลลัพธ์ที่ได้ก็จะนำมา decode แยกเป็นตัวเลขหน้าจุดทศนิยม 1 ตำแหน่ง และตัวเลขหลังจุดทศนิยม 2 ตำแหน่ง ในที่สุดก็จะได้โค้ดดังนี้ครับ

1:  void loop() {  
2:    ADCread=analogRead(POT);  
3:     volts=0;  
4:     decivolts = 0;  
5:     millivolts = (int)((((unsigned long)ADCread)*500)/1023);  
6:     while(millivolts>=100)          //hunderd digit  
7:      {  
8:          millivolts-=100;  
9:          volts++;  
10:      }  
11:      while(millivolts>=10)          //tens digit  
12:      {  
13:          millivolts-=10;  
14:          decivolts++;  
15:      }  
16:    disbuff[0]= volts;          // คำนวณค่าที่จะแสดงในหลักพัน  
17:    disbuff[1]= decivolts;               // คำนวณค่าที่จะแสดงในหลักร้อย  
18:    disbuff[2]= millivolts;          // คำนวณค่าที่จะแสดงในหลักสิบ  
19:    display();  
20:    delay(10);  
21:  }  

               คราวนี้มีปัญหาตามมานิดหน่อยคือเราต้องแสดงจุดทศนิยมหลังตัวเลขหลักแรกด้วย แต่ค่าในตัวแปร Dis_table[] เป็นค่าสำหรับแสดงตัวเลข 0 - 9 โดยที่ไม่มีจุดซึ่งเรายังจำเป็นต้องใช้ในการแสดงผลตัวเลขหลังจุดทศนิยมสองตำแหน่งดังนั้นไม่ควรไปเปลี่ยนแก้มัน ผมเลยประกาศตัวแปรใหม่ชื่อ Dis_table_DOT[] ให้เก็บค่าคงที่สำหรับแสดงตัวเลข 0 - 5 พร้อมจุดทศนิยม( เราใช้แค่ 0 - 5 เพราะแรงดันสูงสุดเพียงแค่ 5 โวลต์ครับ ) นอกจากนี้ก็ยังมีการประกาศตัวแปรเพิ่มอีก 3 ตัวเพื่อใช้เก็บค่าตัวเลขหลังจาก decode แล้ว ดังนั้นตัวแปรทั้งหมดจึงเป็นดังนี้ครับ

1:  const byte Dis_table[] = {0xC0,0xF9,0xA4,0xB0,0x99,0x92,0x82,0xF8,0X80,0X90};      // ค่าตัวเลขที่ใช้แสดงใน 7 segment  
2:  const byte Dis_table_DOT[] = {0x40,0x79,0x24,0x30,0x19,0x12};             // ค่าตัวเลขที่ใช้แสดงใน 7 segment พร้อมจุดทศนิยม   
3:  const byte Dis_buf[]  = {0xF1,0xF2,0xF4,0xF8};                         // ตำแหน่งของ 7 segment ที่ต้องการแสดง  
4:  unsigned char disbuff[] = {0, 0, 0};  
5:  uint16_t millivolts,ADCread;  
6:  uint8_t volts,decivolts;  

               และสุดท้ายในฟังก์ชัน display() ก็ต้องมีการปรับแก้กันเล็กน้อยโดยในการแสดงตัวเลขหลักแรกให้ใช้ค่าคงที่จาก Dis_table_DOT ส่วนสองหลักถัดมาก็ให้ใช้ค่าคงที่จาก Dis_table แทน เท่านี้เราก็จะสามารถแสดงค่าแรงดันตกคร่อม POT บน 7-segment ได้แล้วครับ
โค้ดส่วนฟังกชัน display() ครับ

1:  void display()  
2:  {  
3:    char i;  
4:   for(i=0; i<3; i++)  
5:   {  
6:     if(i==0){  
7:        digitalWrite(LATCH_DIO,LOW);                             // เคลียร์ค่าตัวเลข  
8:        shiftOut(DATA_DIO, CLK_DIO, MSBFIRST, Dis_table_DOT[disbuff[i]]); // ตัวเลขที่จะแสดง  
9:        shiftOut(DATA_DIO, CLK_DIO, MSBFIRST, Dis_buf[i] );            // ตำแหน่งที่จะแสดง       
10:        digitalWrite(LATCH_DIO,HIGH);                            // แสดงค่าตัวเลข         
11:     }  
12:     else{  
13:      digitalWrite(LATCH_DIO,LOW);                         // เคลียร์ค่าตัวเลข  
14:      shiftOut(DATA_DIO, CLK_DIO, MSBFIRST, Dis_table[disbuff[i]]); // ตัวเลขที่จะแสดง  
15:      shiftOut(DATA_DIO, CLK_DIO, MSBFIRST, Dis_buf[i] );        // ตำแหน่งที่จะแสดง       
16:      digitalWrite(LATCH_DIO,HIGH);                        // แสดงค่าตัวเลข            
17:     }  
18:     delay(2);                 
19:   }   
20:  }  

และนี่คือโค้ดตัวเต็มของโปรแกรมที่สองครับ

1:  /*-----------------------------------------------------  
2:  Author: --<Ekkachai Muangrodpai>  
3:  Date: 2016-10-25  
4:  Description: Read the voltage drop on POT of Multifunction shield, then   
5:           calculate the voltage and Display on 7-Segment.  
6:  -----------------------------------------------------*/  
7:  /* Define shift register pins used for seven segment display */  
8:  #define LATCH_DIO   24  
9:  #define CLK_DIO     16  
10:  #define DATA_DIO    5  
11:  #define POT   A0  
12:  const byte Dis_table[] = {0xC0,0xF9,0xA4,0xB0,0x99,0x92,0x82,0xF8,0X80,0X90};      // ค่าตัวเลขที่ใช้แสดงใน 7 segment  
13:  const byte Dis_table_DOT[] = {0x40,0x79,0x24,0x30,0x19,0x12};             // ค่าตัวเลขที่ใช้แสดงใน 7 segment พร้อมจุดทศนิยม   
14:  const byte Dis_buf[]  = {0xF1,0xF2,0xF4,0xF8};                         // ตำแหน่งของ 7 segment ที่ต้องการแสดง  
15:  unsigned char disbuff[] = {0, 0, 0};  
16:  uint16_t millivolts,ADCread;  
17:  uint8_t volts,decivolts;  
18:  void setup() {  
19:   pinMode(LATCH_DIO,OUTPUT);  
20:   pinMode(CLK_DIO,OUTPUT);  
21:   pinMode(DATA_DIO,OUTPUT);   
22:   pinMode(25,INPUT);    //turn off buzzer first  
23:  }  
24:  void display()  
25:  {  
26:    char i;  
27:   for(i=0; i<3; i++)  
28:   {  
29:     if(i==0){  
30:        digitalWrite(LATCH_DIO,LOW);                             // เคลียร์ค่าตัวเลข  
31:        shiftOut(DATA_DIO, CLK_DIO, MSBFIRST, Dis_table_DOT[disbuff[i]]); // ตัวเลขที่จะแสดง  
32:        shiftOut(DATA_DIO, CLK_DIO, MSBFIRST, Dis_buf[i] );            // ตำแหน่งที่จะแสดง       
33:        digitalWrite(LATCH_DIO,HIGH);                            // แสดงค่าตัวเลข         
34:     }  
35:     else{  
36:      digitalWrite(LATCH_DIO,LOW);                         // เคลียร์ค่าตัวเลข  
37:      shiftOut(DATA_DIO, CLK_DIO, MSBFIRST, Dis_table[disbuff[i]]); // ตัวเลขที่จะแสดง  
38:      shiftOut(DATA_DIO, CLK_DIO, MSBFIRST, Dis_buf[i] );        // ตำแหน่งที่จะแสดง       
39:      digitalWrite(LATCH_DIO,HIGH);                        // แสดงค่าตัวเลข            
40:     }  
41:     delay(2);                 
42:   }   
43:  }  
44:  void loop() {  
45:    ADCread=analogRead(POT);  
46:     volts=0;  
47:     decivolts = 0;  
48:     millivolts = (int)((((unsigned long)ADCread)*500)/1023);  
49:     while(millivolts>=100)          //hunderd digit  
50:      {  
51:          millivolts-=100;  
52:          volts++;  
53:      }  
54:      while(millivolts>=10)          //tens digit  
55:      {  
56:          millivolts-=10;  
57:          decivolts++;  
58:      }  
59:    disbuff[0]= volts;          // คำนวณค่าที่จะแสดงในหลักพัน  
60:    disbuff[1]= decivolts;               // คำนวณค่าที่จะแสดงในหลักร้อย  
61:    disbuff[2]= millivolts;          // คำนวณค่าที่จะแสดงในหลักสิบ  
62:    display();  
63:    delay(10);  
64:  }  

และด้านล่างนี้คือวิดีโอแสดงการทำงานครับ


ขอบคุณที่ติดตามครับ :>

วันศุกร์ที่ 12 สิงหาคม พ.ศ. 2559

Pinguino กับ 7-segment บน Multifunction Shield


               หลังจากได้ลองค้นดูว่ายังมี shield อะไรเก็บไว้อยู่บ้างก็เจอว่ายังมีตัว Multifunction Shield ที่ดูน่าสนใจเอามาเขียนโปรแกรมกับบอร์ด Pinguino 8 ที่ดูน่าสนใจที่สุดบนบอร์ดก็ต้องเป็นเจ้า 7-segment 4 หลักที่เชื่อมต่ออยู่กับ IC serial-to-parallel 74HC595 เมื่อพอลองหาข้อมูลจากเว็ปดูก็ไปได้ข้อมูลจากลิ้งค์ข้างล่างนี้ 
https://wiki.eprolabs.com/index.php?title=Multi-functional_Learning_Board_for_Arduino
รูปที่ 1 Schematic ส่วนของ 7-Segment กับ 74HC595
รูปที่ 2 หมายเลขพินของบอร์ด Pinguino 8
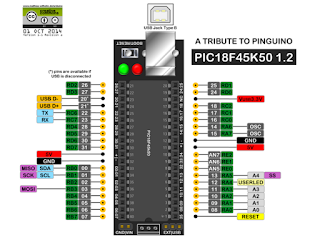
              พอดูที่ schematic จะเห็นว่า 7-segment 4 หลักที่อยู่บนตัว shield นั้นจะมี IC 74HC595 จำนวน 2 ตัวต่อ drive อยู่ โดยตัวแรก( U2) จะเป็นตัวเลือกว่าจะให้ 7-segment หลักไหนแสดงผล ส่วนตัว U3 จะเป็นตัวขับให้แสดงเป็นตัวเลขต่างๆ  อินพุตจะเริ่มจากตัว U2 โดยขา SDI (ขา data)จะต่ออยู่กับพิน 8 ของ Arduino ส่วนขา SFTCLK(ขา clock)จะต่อกับพิน 7 และสุดท้ายขา LCHCLK(ขา latch)จะต่อกับพิน 4 ทีนี้เมื่อเรารู้ตำแหน่งที่เชื่อต่อกับ Arduino แล้ว เมื่อเราต้องการใช้บอร์ด Pinguino 8 แทนเราก็ต้องมาดูว่าที่ตำแหน่งเดียวกันนั้นบนบอร์ด Pinguino 8 เป็นพินหมายเลขอะไร จากในรูปที่ 2 จะเห็นว่าเป็นพินหมายเลข 5, 16, และ 24 ตามลำดับ ดังนั้นเพื่อให้ง่ายในการจำและเขียนโค้ดเราจึงจะ define พินทั้งสามนี้ไว้ดังนี้

1:  /* Define shift register pins used for seven segment display */  
2:  #define LATCH_DIO   24  
3:  #define CLK_DIO     16  
4:  #define DATA_DIO    5  

               จากนั้นเราก็ต้องมากำหนดค่าคงที่ที่เราจะส่งออกไปแล้วทำให้ 7-segment ติดสว่างแสดงเป็นตัวเลข 0-9 เมื่อเราพิจารณาที่ schematic โดยเฉพาะที่ U3 ซึ่งต่อเข้ากับ 7-segment ที่ตำแหน่ง a-h ตามลำดับแล้วโดยเมื่อเราส่ง logic 0 ออกไปที่พินใดๆ(a-h) ก็จะทำให้ segment นั้นๆติดสว่าง(เป็น common Anode) ยกตัวอย่างเช่นต้องการให้เลข 0 ติดสว่างจะต้องให้ logic 0 ที่พิน a, b, c, d, e, f และให้ logic 1 ที่พิน g กับ h และค่า binary นี้จะถูกส่งออกไปทีละบิต โดยถ้ายึดตามโค้ดตัวอย่างของ Arduino ที่เลือกส่งบิต MSB(Most Significant Bit) ออกไปก่อนเราก็จะได้ค่าเป็น 0xC0  และหมายเลขอื่นๆก็ใช้วิธีคิดแบบเดียวกันครับ โดยค่าคงที่ทั้งสิบตัวจะมีค่าเป็นดังนี้

 /* Segment byte maps for numbers 0 to 9 */  
 const byte SEGMENT_MAP[] = {0xC0,0xF9,0xA4,0xB0,0x99,0x92,0x82,0xF8,0X80,0X90};  

และค่าคงที่สำหรับการเลือกว่าจะให้หลักใดติดสว่างก็ใช้วิธีคิดแบบเดียวกันเพียงแต่คราวนี้เราต้องส่ง logic 1 ออกไปยังตำแหน่งที่เราต้องการให้มันติดสว่าง ซึ่งจะมีค่าดังต่อไปนี้


 /* Byte maps to select digit 1 to 4 */  
 const byte SEGMENT_SELECT[] = {0xF1,0xF2,0xF4,0xF8};  

เราเลือกประกาศเป็นค่าคงที่โดยใช้ key word เป็น const เพื่อบอกให้ compiler รู้ว่าค่าใน array เหล่านี้จะไม่มีการเปลี่ยนแปลงค่า ดังนั้น compiler สามารถเก็บค่าเหล่านี้ไว้ใน Flash memory ได้ ทำให้ประหยัด RAM ไปด้วยครับ

               จากนั้นเราก็มาเขียนฟังก์ชั่นที่จะส่งค่าเหล่านี้ออกไปแสดงบน 7-segment แต่ละหลักได้โดยอาศัย shiftOut() ที่ Pinguino มีเตรียมไว้ให้ใช้อยู่แล้ว ซึ่งจะได้เป็นฟังก์ชั่นดังต่อไปนี้ครับ


1:  /* Wite a decimal number between 0 and 9 to one of the 4 digits of the display */  
2:  void WriteNumberToSegment(byte Segment, byte Value)  
3:  {  
4:    digitalWrite(LATCH_DIO,LOW);   
5:    shiftOut(DATA_DIO, CLK_DIO, MSBFIRST, SEGMENT_MAP[Value]);  
6:    shiftOut(DATA_DIO, CLK_DIO, MSBFIRST, SEGMENT_SELECT[Segment] );  
7:    digitalWrite(LATCH_DIO,HIGH);    
8:  }  
             
               และเพื่อให้การเขียนโค้ดง่ายยิ่งขึ้นเราก็จะมีฟังก์ชั่นที่ช่วยแยกตัวเลขที่นับได้ออกเป็นหลักหน่วย หลักสิบ หลักร้อย และหลักพัน เพื่อแสดงผล โดยอาศัยการหารกับหลักนั้นๆ และการหารที่เก็บเฉพาะเศษที่เหลือเท่านั้น(modulus, %) ซึ่งจะได้เป็นฟังก์ชั่นดังต่อไปนี้ครับ


1:  /* Write a decimal number between 0 and 9999 to the display */  
2:  void WriteNumber(int Number)  
3:  {  
4:    WriteNumberToSegment(0 , Number / 1000);  
5:    WriteNumberToSegment(1 , (Number / 100) % 10);  
6:    WriteNumberToSegment(2 , (Number / 10) % 10);  
7:    WriteNumberToSegment(3 , Number % 10);  
8:  }  

               คราวนี้โค้ดตัวอย่างของเราจะทำการแสดงตัวเลขนับค่าเพิ่มขึ้นทุกๆ 500 ms และเราจะใช้ฟังก์ชั่น millis() มาช่วยในการจับเวลาที่จะเพิ่มค่าขึ้น ดังนั้นเราต้องการตัวแปรเพิ่มเติมอีกเพื่อเก็บค่าเวลา ณ ปัจจุบันและค่าเวลาที่ผ่านมา กับตัวแปรไว้นับเลข โดยเราจะประกาศตัวแปรดังนี้


1:  unsigned long Cur_ms_Count;      // Stores the current time in ms  
2:  unsigned long Last_ms_Count;     // Stores the last time in ms the counter was last updated  
3:  unsigned int Count;              // Stores the value that will be displayed  

ในฟังก์ชั่น setup() เราก็กำหนดให้พินที่ควบคุม 74HC595 ที่เรา define ไว้ให้เป็นเอ้าต์พุต และกำหนดค่าเริ่มต้นให้แก่ตัวแปรจับเวลาดังนี้ครับ


1:  void setup() {  
2:    pinMode(25,INPUT);    //turn off buzzer first  
3:   /* Set DIO pins to outputs */  
4:   pinMode(LATCH_DIO,OUTPUT);  
5:   pinMode(CLK_DIO,OUTPUT);  
6:   pinMode(DATA_DIO,OUTPUT);    
7:   /* Initiliase the registers used to store the current time and count */  
8:   Cur_ms_Count = millis();  
9:   Last_ms_Count = 0;  
10:   Count = 0;    
11:  }  

สุดท้ายในฟังก์ชั่น loop() เราก็เพียงแต่คอยเพิ่มค่าทุกๆ 500 ms แล้วเรียกฟังก์ชั่นช่วยเหลือเพื่อแสดงตัวเลขออกไปเท่านั้นเองครับ โดยโค้ดตัวเต็มจะเป็นดังนี้นะครับ


/*-----------------------------------------------------
Author:  --<Ekkachai Muangrodpai>
Date: 2016-08-12
Description: Display and update a number on 7-Segment 
      every 500 ms.
-----------------------------------------------------*/
/* Define shift register pins used for seven segment display */
#define LATCH_DIO     24
#define CLK_DIO       16
#define DATA_DIO      5
 
/* Segment byte maps for numbers 0 to 9 */
const byte SEGMENT_MAP[] = {0xC0,0xF9,0xA4,0xB0,0x99,0x92,0x82,0xF8,0X80,0X90};
/* Byte maps to select digit 1 to 4 */
const byte SEGMENT_SELECT[] = {0xF1,0xF2,0xF4,0xF8};

unsigned long Cur_ms_Count;  // Stores the current time in ms
unsigned long Last_ms_Count;  // Stores the last time in ms the counter was last updated
unsigned int  Count;   // Stores the value that will be displayed

/* Wite a decimal number between 0 and 9 to one of the 4 digits of the display */
void WriteNumberToSegment(byte Segment, byte Value)
{
  digitalWrite(LATCH_DIO,LOW); 
  shiftOut(DATA_DIO, CLK_DIO, MSBFIRST, SEGMENT_MAP[Value]);
  shiftOut(DATA_DIO, CLK_DIO, MSBFIRST, SEGMENT_SELECT[Segment] );
  digitalWrite(LATCH_DIO,HIGH);    
}

/* Write a decimal number between 0 and 9999 to the display */
void WriteNumber(int Number)
{
  WriteNumberToSegment(0 , Number / 1000);
  WriteNumberToSegment(1 , (Number / 100) % 10);
  WriteNumberToSegment(2 , (Number / 10) % 10);
  WriteNumberToSegment(3 , Number % 10);
}
void setup() {
    pinMode(25,INPUT);        //turn off buzzer first
   
  /* Set DIO pins to outputs */
  pinMode(LATCH_DIO,OUTPUT);
  pinMode(CLK_DIO,OUTPUT);
  pinMode(DATA_DIO,OUTPUT); 
  
  /* Initiliase the registers used to store the current time and count */
  Cur_ms_Count = millis();
  Last_ms_Count = 0;
  Count = 0;    
}

void loop() {   
  /* Get how much time has passed in milliseconds */
  Cur_ms_Count = millis();
  
  /* If 100ms has passed then add one to the counter */
  if(Cur_ms_Count - Last_ms_Count > 500)
  {
    Last_ms_Count = Cur_ms_Count;
    
    if(Count < 9999)
    {
      Count++;
    } else
    {
      Count = 0;
    }
  }
  
  /* Update the display with the current counter value */
  WriteNumber(Count);  
}


วันอังคารที่ 2 สิงหาคม พ.ศ. 2559

Pinguino กับ LCD Keys pad shield V1.2 (another shield)


              ในบทความก่อนหน้านี้ผมได้เขียนถึงการใช้บอร์ด Pinguino 8 เชื่อมต่อกับ LCD key pad shield, อันนี้ครับ
ซึ่งหลังเขียนเสร็จแล้วผมก็นึกขึ้นมาได้ว่ายังมี LCD key pad shield อยู่อีกอันหนึ่ง( ยี่ห้อ ElecFreaks , shield สีขาวในรูปด้านบน )ซึ่งแตกต่างจากอันแรกตรงที่ใช้ปุ่มกดแบบจอยสติ้ก 5 ทิศทางแทน แต่ยังคงเชื่อมต่อกับไมโครคอนโทรลเลอร์ที่ขา A0 เหมือนเดิมทำให้สามารถใช้โค้ดเดิมได้ และที่เพิ่มขึ้นมาอีกอันก็คือตัว rotary encoder ที่ถ้าดูผิวเผินแล้วเหมือนตัวโวลุ่มเลย โดยเราสามารถหมุนได้ทั้งสองทิศทางซึ่งจะให้เอ้าพุตออกมาสองแชลแนล และมีพัลล์เหลื่อมกันดังแสดงในรูปที่ 2 นอกจากนี้ยังสามารถกดลงคล้ายกับการกดปุ่ม enter ได้อีกด้วย โดยในบทความนี้จะมุ่งเน้นที่การเขียนโค้ดเพิ่อตรวจจับการหมุนหรือเปลี่ยนตำแหน่งของ encoder โดยอาศัยอินเตอร์รับออนเชนต์( interrupt on change ) และมีแก้ไขค่าคงที่ของ keys ต่างๆเพื่อรองรับการกดปุ่มของ encoder ที่เพิ่มเติมขึ้นมา โดยผู้อ่านสามารถหาข้อมูลเพิ่มเติมเกี่ยวกับ shield ตัวนี้ได้จากลิ้งค์ต่อไปนี้ ซึ่งจะมี schematic, datasheet, และโค้ดตัวอย่างของ Arduino ที่เราสามารถนำมาใช้ได้กับ Pinguino ของเรา
รูปที่ 2 เอ้าพุตของ rotary encoder

วิธีการอ่านค่าของ rotary encoder นั้นสามารถหาอ่านเพิ่มเติมได้จากฟอร์รั่มของ Arduino เช่นลิ้งค์ต่อไปนี้

หรือลิ้งค์อันนี้ก็ให้ข้อมูลดีครับและใช้ C18 ในการเขียนโค้ดด้วย

จาก schematic ที่สามารถโหลดได้จากลิ้งค์แรกนั้นจะเห็นว่าเอ้าพุตของ rotary encoder นั้นจะต่ออยู่กับ pin 2 และ 3 ของ Arduino ซึ่งทั้งสองพินนี้นั้นสามารถ config ให้เป็น external interrupt และสามารถเลือกได้ว่าจะให้เกิด interrupt เมื่อเกิดสัญญานขอบขาขึ้นหรือขอบขาลง คราวนี้เมื่อผมจะใช้บอร์ด Pinguino 8 มาแทน Arduino พอเช็คขาที่ตำแหน่งเดียวกันนี้พบว่าบอร์ด Pinguino 8 ที่ตำแหน่ง D2 กับ D3 นี้ไม่รองรับ external interrupt ทำให้ผมต้องมาทำการโมดิฟายตัว shield โดยบัดกรีสายจากตำแหน่ง D2 กับ D3 ไปที่ตำแหน่ง D12 และ D13 ตามลำดับดังแสดงในรูปที่ 3 ครับ

รูปที่ 3 บัดกรีสายจาก D2, D3 ไป D12, D13

โดยที่ตำแหน่งใหม่นี้จะเป็นพินหมายเลข 0 และ 1 บนบอร์ด Pinguino 8 ดังแสดงในรูปที่ 4 ซึ้่งทั้งสองพินนี้รองรับ interrupt on change ตามที่เราต้องการ
รูปที่ 4 หมายเลขพินบน Pinguino 8
               เมื่อ hardware ของเราพร้อมแล้วทีนี้ก็มาถึงขั้นตอนการเขียนโค้ด จากในรูปที่ 2 เมื่อพิจารณาให้ดีจะเห็นว่าในจังหวะที่พัลล์เอ้าพุตแชลแนล A ของ rotary encoder เปลี่ยนลอจิกจาก HIGH เป็น LOW ( Falling Edge ) แล้วถ้าเราอ่านค่าของเอ้าพุตแชลแนล B ได้ค่าเป็น HIGH นั่นแสดงว่า rotary encoder ถูกหมุนไปในทิศทางตามเข็มนาฬิกา ( Clockwise ) เราก็สามาถเพิ่มค่าในตัวแปรที่เราเอาไว้เก็บค่าการหมุนได้ 
               ในทางตรงกันข้ามหากจังหวะที่เอ้าพุตแชลแนล A ของ rotary encoder เปลี่ยนลอจิกจาก HIGH เป็น LOW ( Falling Edge ) แล้วถ้าเราอ่านค่าของเอ้าพุตแชลแนล B ได้ค่าเป็น LOW นั่นแสดงว่า rotary encoder ถูกหมุนไปในทิศทางทวนเข็มนาฬิกา ( Counter-Clockwise ) เราก็สามาถบดค่าในตัวแปรที่เราเอาไว้เก็บค่าการหมุนได้ 
               เมื่อเรารู้แนวคิดในการเขียนโค้ดแล้วเราก็สามารถเริ่มเขียนได้โดยเริ่มจากการ define ชื่อขาของ rotary encoder เพื่อให้ง่ายในการอ่านและเขียนโค้ด และประกาศตัวแปรที่เอาไว้เก็บค่าการหมุน พร้อมทั้งตัวแปรที่จำเป็นดังนี้

1:  #define Encoder_A  0  
2:  #define Encoder_B  1  
3:  volatile int Encoder_number=0;  
4:  volatile u8 state=0;  

จากนั้นในฟังก์ชัน setup() เราก็ config ให้ขา encoder เป็น input ซะ แต่อย่าลืมที่ตำแหน่ง D2 กับ D3 ของ shield นั้นเมื่อเสียบลงบนบอร์ด Pinguino 8 แล้วจะเป็นพินหมายเลข 25 กับ 26 ( ดูได้จากรูปที่ 4 ) ซึ่งโดย default ของตัวไมโครคอนโทรลเลอร์(PIC18F45K50)เองหลังจาก power on or reset ขึ้นมามันจะเป็น output ซึ่งจะทำให้ feature อินเตอร์รัพที่ขา 0 กับ 1 ไม่ทำงานดังนั้นเราจำเป็นต้อง config พิน 25 กับ 26 ให้เป็น input (high impedance) ด้วย interrupt on change ถึงจะทำงานได้ถูกต้อง (หรือไม่งั้นก็ต้องตัดขา D2 กับ D3 ของ shield ทิ้งซะก่อน) จากนั้นจึงจะ enable ความสามารถ Interrupt On Change บน pin 0 โดยให้เกิด interrupt ทุกๆขอบขาลง ( INT_FALLING_EDGE ) โดยเมื่อดักจับขอบขาลงได้ให้กระโดดไปทำงานที่ฟังก์ชั่นชื่อ Encode() ดังตัวอย่างโค้ดต่อไปนี้ครับ


1: //make the pin 2 and 3(which is pin 25, and 26 on Pinguino 8) of LCD keypad shield as input  
2: //so that the pin 0 and 1 of Pinguino 8 that we use for interrupt on change can work correctly  
3:    pinMode(25, INPUT);      
4:    pinMode(26, INPUT);  

5:    pinMode(Encoder_A, INPUT);   
6:    pinMode(Encoder_B, INPUT);   
7:    digitalWrite(Encoder_A, HIGH);  
8:    digitalWrite(Encoder_B, HIGH);  

9:    OnChangePin0(Encode, INT_FALLING_EDGE);  

ในส่วนของฟังก์ชั่น Encode() นั้นเราก็เพียงอ่านค่าของ Encoder_B หากอ่านได้เป็น 1 (HIGH) ก็ให้เพิ่มค่าตัวแปร แต่หากอ่านค่าได้เป็น 0 (LOW) ก็ลดค่าตัวแปรลง จากนั้นจึงบอกให้ฟังก์ชัน loop รู้ว่า rotary encoder มีการหมุน( เปลี่ยนแปลงค่า ) โดยการเซ็ทให้ตัวแปร state เป็น 1 เพื่อที่ในฟังก์ชั่น loop จะได้อัพเดตค่าบนจอ LCD ต่อไป ตัวอย่างโค้ดก็จะเป็นตามนี้นะครับ


1:  void Encode(){  
2:    if(digitalRead(Encoder_B))  
3:       {  
4:         Encoder_number++;  
5:       }  
6:      else  
7:       {   
8:        Encoder_number--;  
9:       }     
10:       state=1;  
11:  }  

และในส่วนของฟังก์ชั่น loop() เราก็จะเพิ่มโค้ดเพื่ออัพเดตค่าของ Encoder_number บนจอ LCD โดยจะทำการอัพเดตก็ต่อเมื่อมีการหมุน rotary encoder เท่านั้น ดังโค้ดตัวอย่างต่อไปนี้ครับ


1:  if(state==1)  
2:   {   
3:    lcd.clear();  
4:    lcd.setCursor(9,1);      // move cursor to second line "1" and 9 spaces over   
5:    lcd.printf("%d",Encoder_number);   
6:    lcd.setCursor(0,0);      // move cursor to second line "1" and 9 spaces over   
7:    lcd.printf("Push the buttons"); // print a simple message   
8:    state=0;  
9:   }   

สุดท้ายเราก็จะมาแก้ไขค่าการเปรียบเทียบค่าที่อ่านได้จาก ADC จากตัวอย่างในบทความเกี่ยวกับ LCD keys pad shield ที่ผ่านมา โดยแก้ไขค่าเป็นดังนี้ครับ


1:  if (adc_key_in > 1000) return btnNONE; // We make this the 1st option for speed reasons since it will be the most likely result  
2:   // For V1.1 us this threshold  
3:   if (adc_key_in < 50)  return btnLEFT;  
4:   if (adc_key_in < 150) return btnUP;  
5:   if (adc_key_in < 250) return btnRIGHT;  
6:   if (adc_key_in < 450) return btnSELECT;  
7:   if (adc_key_in < 700) return btnDOWN;  
8:   if (adc_key_in < 850) return btnEncodeOK;   

และต้องเพิ่มสเตรทในฟังก์ชั่น loop ขึ้นอีกอันหนึ่งด้วย สำหรับปุ่ม Encode OK ซึ่งโค้ดตัวเต็มก็จะเป็นดังนี้ครับ
1:  /*-----------------------------------------------------  
2:  Author: --<Ekkachai Muangrodpai>  
3:  www.picgetstart.blogspot.com  
4:  Date: 2016-03-18  
5:  Board:  Pinguino8 by Jimmy + LCD Keypads Shield V.1  
6:  Description:  
7:  -Display a message on LCD Keypads Shield, and also read a keys through analog AN0.  
8:  -At the same time, display the second time too.  
9:   * LCD RS pin to digital pin 5  
10:   * LCD E pin to digital pin 4  
11:   * LCD D4 pin to digital pin 24  
12:   * LCD D5 pin to digital pin 18  
13:   * LCD D6 pin to digital pin 17  
14:   * LCD D7 pin to digital pin 16  
15:   * LCD R/W pin to ground  
16:   note:  
17:   - don't use lcd.print() and lcd.printf() in the same program.  
18:  -----------------------------------------------------*/  
19:  #define BACK_LIGHT  2    //LCD back light control by pin2  
20:  // define some values used by the panel and buttons  
21:  int lcd_key   = 0;  
22:  int adc_key_in = 0;  
23:  #define btnRIGHT 0  
24:  #define btnUP   1  
25:  #define btnDOWN  2  
26:  #define btnLEFT  3  
27:  #define btnSELECT 4  
28:  #define btnNONE  5  
29:  #define btnEncodeOK 6  
30:  #define Encoder_A  0  
31:  #define Encoder_B  1  
32:  volatile int Encoder_number=0;  
33:  volatile u8 state=0;  
34:  // read the buttons  
35:  int read_LCD_buttons()  
36:  {  
37:   adc_key_in = analogRead(0);   // read the value from the sensor   
38:  // my buttons when read are centered at these valies: 0, 144, 329, 504, 741  
39:   // we add approx 50 to those values and check to see if we are close  
40:   if (adc_key_in > 1000) return btnNONE; // We make this the 1st option for speed reasons since it will be the most likely result  
41:   // For V1.1 us this threshold  
42:   if (adc_key_in < 50)  return btnLEFT;  
43:   if (adc_key_in < 150) return btnUP;  
44:   if (adc_key_in < 250) return btnRIGHT;  
45:   if (adc_key_in < 450) return btnSELECT;  
46:   if (adc_key_in < 700) return btnDOWN;  
47:   if (adc_key_in < 850) return btnEncodeOK;   
48:   return btnNONE; // when all others fail, return this...  
49:  }  
50:  void Encode(){  
51:    if(digitalRead(Encoder_B))  
52:       {  
53:         Encoder_number++;  
54:       }  
55:      else  
56:       {   
57:        Encoder_number--;  
58:       }     
59:       state=1;  
60:  }  
61:  void setup( void) {  
62:    // put your setup code here, to run once:  
63:    pinMode(BACK_LIGHT, OUTPUT);  
64:    digitalWrite(BACK_LIGHT, HIGH);  
65:    // initialize the library with the numbers of the interface pins    
66:    lcd.pins(5, 4, 24, 18, 17, 16, 0, 0, 0, 0); // RS, E, D4 ~ D8    
67:    // set up the LCD's number of columns and rows:   
68:    lcd.begin(16, 2);  
69:    // Print a message to the LCD.  
70:    lcd.clear();  
71:    lcd.setCursor(0,0);  
72:    lcd.printf("Push the buttons"); // print a simple message  
73:    //make the pin 2 and 3(which is pin 25, and 26 on Pinguino 8) of LCD keypad shield as input  
74:    //so that the pin 0 and 1 of Pinguino 8 that we use for interrupt on change can work correctly  
75:    pinMode(25, INPUT);      
76:    pinMode(26, INPUT);  
77:    pinMode(Encoder_A, INPUT);   
78:    pinMode(Encoder_B, INPUT);   
79:    digitalWrite(Encoder_A, HIGH);  
80:    digitalWrite(Encoder_B, HIGH);  
81:    OnChangePin0(Encode, INT_FALLING_EDGE);  
82:  }  
83:  void loop( void ) {  
84:   if(state==1)  
85:   {   
86:    lcd.clear();  
87:    lcd.setCursor(9,1);      // move cursor to second line "1" and 9 spaces over   
88:    lcd.printf("%d",Encoder_number);   
89:    lcd.setCursor(0,0);      // move cursor to second line "1" and 9 spaces over   
90:    lcd.printf("Push the buttons"); // print a simple message   
91:    state=0;  
92:   }   
93:   lcd.setCursor(0,1);      // move to the begining of the second line  
94:   lcd_key = read_LCD_buttons(); // read the buttons  
95:   switch (lcd_key)        // depending on which button was pushed, we perform an action  
96:   {  
97:    case btnRIGHT:  
98:     {  
99:       lcd.printf("RIGHT  ");  
100:       break;  
101:     }  
102:    case btnLEFT:  
103:     {  
104:       lcd.printf("LEFT   ");  
105:       break;  
106:     }  
107:    case btnUP:  
108:     {  
109:       lcd.printf("UP    ");  
110:       break;  
111:     }  
112:    case btnDOWN:  
113:     {  
114:       lcd.printf("DOWN  ");  
115:       break;  
116:     }  
117:    case btnSELECT:  
118:     {  
119:       lcd.printf("SELECT  ");  
120:       break;  
121:     }  
122:    case btnNONE:  
123:     {  
124:       lcd.printf("NONE  ");  
125:       break;  
126:     }  
127:     case btnEncodeOK:  
128:     {  
129:       lcd.printf("EncdOK  ");  
130:       break;  
131:     }  
132:   }  
133:  }  

และข้างล่างนี้คือวิดีโอผลการทำงานของ Pinguino 8 กับ LCD key pad shield V1.2 ครับ


วันอังคารที่ 12 กรกฎาคม พ.ศ. 2559

Pinguino กับ LCD Adaptor Plate I2C


               บทความครั้งนี้ผมจะเขียนถึงการใช้งาน LCD Adaptor Plate I2C หรือบางทีก็เรียกว่า I2C Convertor Module for LCD1602/2004 ซึ่งรูปร่างหน้าตาของมันก็จะอยู่ในรูปที่ 1 เจ้าตัวนี้นั้นถูกออกแบบมาเพื่อให้สามารถใช้สายสัญญานเพียงสองเส้นก็สามารถสื่อสารและแสดงข้อความบนจอ LCD ขนาด 16x2 หรือ 20x4 ได้แล้ว จากเดิมที่ต้องใช้อย่างน้อย 6 เส้นถึงจะสื่อสารกันได้  อีกทั้งราคาที่ถูกมากจึงได้รับความนิยมสูง โดยตัว I2C converter นี้จะมีอยู่หลายเวอร์ชัน ซึ่งแต่ละเวอร์ชันก็จะมี I2C address ไม่เหมือนกัน ข้อมูลเพิ่มเติมสามารถหาอ่านได้จากที่นี่ครับ ค่อนข้างละเอียดดีทีเดียว
รูปที่ 1 LCD Adaptor Plate I2C

               จากการดูและเปรียบเทียบแล้วตัวที่ผมมีอยู่นั้นมี หมายเลข I2C address เป็น 0x27 เมื่อรู้ดังนี้แล้วก็เริ่ม wiring สายจาก I2C convertor ไปที่ตัวบอร์ด Pinguino 8 ซึ่งก็จะมีเพียงแค่ 4 เส้นเท่านั้น คือ Vdd, Gnd, SCL, SDA
ซึ่งก็จะมี label พิมพ์ติดไว้อยู่แล้วทั้งบน I2C convertor และ Pinguino 8 โดยเมื่อต่อเสร็จแล้วก็จะได้ตามรูปที่ 2 ครับ
รูปที่ 2 เชื่อมต่อกับ Pinguino 8
และในส่วนของโค้ดที่จะเขียนนั้นง่ายและสั้นมากครับโดยเราเพียงต้อง initialize เจ้า I2C convertor ว่าต่ออยู่กับจอ LCD ขนาดเท่าไหร่ 16x2 หรือ 20x4 และกำหนดหมายเลข address ให้ตรงกับของ I2C convertor เท่านั้นเองซึ่งตัวที่ผมใช้คือ 0x27 โดยโค้ดจะเป็นดังนี้ครับ

1:  lcdi2c.init(16,2,0x27);  
2:  lcdi2c.backlight();  
3:  lcdi2c.printf("Hello Thailand");  

               ในบรรทัดแรกเป็นการ initialize อย่างที่ได้อธิบายด้านบน ส่วนบรรทัดถัดมาเป็นการสั่งให้ไฟ back light สว่างขึ้นมา และบรรทัดสุดท้ายก็ให้ส่งข้อความ Hello Thailand ออกมาแสดงครับ เมื่อเราสั่งคอมไพล์และโปรแกรมลงตัวไมโครคอนโทรลเลอร์แล้วก็จะจะจะ……..อ้าว! ทำไมไม่มีอะไรเกิดขึ้นเลย ต่อสาย SCL กับ SCA  สลับกันหรือเปล่า ? ก็ถูกนี่ งั้นโค้ดต้องผิดแน่นอนเลย!!!!!


               นั่นคือประสบการณ์ครั้งแรกของผมกับ Pinguino กับ I2C converter for LCD ครับ ผมใช้เวลาอยู่หลายวันหาข้อมูลจากอินเตอร์เน็ทก็หาไม่ค่อยได้ สุดท้ายผมหาเจอ schematic หรือ ใน Arduino forum นี่แหละจำไม่ค่อยได้แล้วครับ ประกอบกับนั่งอ่าน library ของ Pinguino เองจนพบว่าในไฟล์ที่ชื่อ lcdi2c.h ที่อยู่ในโฟล์เดอร์ ‘C:\pinguino-11\p8\include\pinguino\libraries’ นั้น define ขาที่ต่อกับ PCF8574 ไม่ตรงกันโดยของเดิมจะเป็น

1:  #define LCD_BL     PCF8574_data.bits.bit0     // P0  
2:  #define LCD_RS     PCF8574_data.bits.bit1     // P1  
3:  #define LCD_RW     PCF8574_data.bits.bit2     // P2  
4:  #define LCD_EN     PCF8574_data.bits.bit3     // P3  

ผมจึงแก้ไขใหม่ให้ตรงกับตัว I2C convertor for LCD ที่ผมมีอยู่โดยแก้เป็นของใหม่ดังนี้ครับ

1:  #define LCD_BL     PCF8574_data.bits.bit3     // P0  
2:  #define LCD_RS     PCF8574_data.bits.bit0     // P1  
3:  #define LCD_RW     PCF8574_data.bits.bit1     // P2  
4:  #define LCD_EN     PCF8574_data.bits.bit2     // P3  

หลังจาก save file แล้ว ทำการคอมไพล์ใหม่และโปรแกรมลงไมโครคอนโทรลเลอร์อีกครั้ง คราวนี้…..ทำงานได้แล้วครับ เย้ๆ ลองดูจากวิดีโอดูนะครับ ส่วนข้างล่างนี้เป็นโค้ดทั้งหมดนะครับ


1:  /*-----------------------------------------------------  
2:  Author: --<Ekkachai Muangrodpai>  
3:  Board:  Pinguino8 + I2C LCD board.  
4:  Date: 2016-03-20  
5:  Description:  
6:  - display message on LCD through I2C adaptor.  
7:  -----------------------------------------------------*/  
8:  /*  
9:    Note: must change the definition in 'lcdi2c.h' to match the hardware. Like following:    
10:  #define LCD_BL     PCF8574_data.bits.bit3     // P0  
11:  #define LCD_RS     PCF8574_data.bits.bit0     // P1  
12:  #define LCD_RW     PCF8574_data.bits.bit1     // P2  
13:  #define LCD_EN     PCF8574_data.bits.bit2     // P3  
14:   */  
15:  void setup() {  
16:    // put your setup code here, to run once:  
17:    lcdi2c.init(16,2,0x27);  
18:    lcdi2c.backlight();  
19:    lcdi2c.printf("Hello Thailand");    
20:  }  
21:  void loop() {  
22:    // put your main code here, to run repeatedly:  
23:  }  


ของแถมครับ จาก link ข้างบนผมเห็นมีตัวอย่างของ Arduino ที่ใช้ Serial รับค่า string จากคอมพิวเตอร์แล้วเอามาแสดงผลบนจอ LCD ที่ต่อผ่าน I2C adaptor for LCD ซึ่งน่าสนุกดีผมจึงลองเขียนด้วย Pinguino ดูบ้างโดยใช้ฟังก์ชันจากบทความนี้และจากบทความที่ผ่านมาเรื่อง Pinguino สื่อสารผ่าน Com Port ก็ได้มาเป็นโค้ดที่แสดงข้างล่างต่อไปนี้ครับลองทดลองกันดูนะครับ
1:  /*-----------------------------------------------------  
2:  Author: --<Ekkachai Muangrodpai>  
3:  Board:  Pinguino8 + I2C convertor for LCD board + USB-to-Serial.  
4:  Date: 2016-07-11  
5:  Description:  
6:  - Get string from computor through terminal program, then display on LCD.  
7:  -----------------------------------------------------*/  
8:  int i;  
9:  void setup() {  
10:   Serial.begin(9600);    
11:   lcdi2c.init(16, 2, 0x27);         
12:   // ------- Quick 3 blinks of backlight -------------  
13:   for(i = 0; i< 3; i++)  
14:   {  
15:    lcdi2c.backlight();  
16:    delay(250);  
17:    lcdi2c.noBacklight();  
18:    delay(250);  
19:   }  
20:   lcdi2c.backlight(); // finish with backlight on   
21:   //-------- Write characters on the display ------------------  
22:   lcdi2c.setCursor(0,0);   
23:   lcdi2c.printf("Hello, World!....");  
24:   delay(1000);  
25:   lcdi2c.setCursor(0,1);  
26:   lcdi2c.printf("Hi Your Pinguino");  
27:   delay(1000);   
28:  // Wait and then tell user they can start the Serial Monitor and type in characters to  
29:  // Display. (Set Serial Monitor option to "No Line Ending")  
30:   lcdi2c.clear();  
31:   lcdi2c.setCursor(0,0); //Start at character 0 on line 1  
32:   lcdi2c.printf("Use Serial Mon");  
33:   lcdi2c.setCursor(0,1);  
34:   lcdi2c.printf("Type to display");    
35:  }  
36:  void loop() {  
37:    // when characters arrive over the serial port...  
38:    if (Serial.available()) {     
39:     delay(100);          // wait a bit for the entire message to arrive      
40:     lcdi2c.clear();  
41:     // read all the available characters  
42:     while (Serial.available() > 0) {      
43:      lcdi2c.write(Serial.read());          // display each character to the LCD  
44:     }  
45:    }  
46:  }  

วันเสาร์ที่ 9 กรกฎาคม พ.ศ. 2559

Pinguino กับ LCD Keys pad shield part 2


               จากบทความที่แล้วเราสามารถติดต่อกับ LCD shield และแสดงข้อความออกที่หน้าจอได้แล้ว ในบทความต่อเนื่องชิ้นนี้เราจะมาเขียนโค้ดเพื่อให้ LCD Keys pad shield ทำงานได้เหมือนอย่างเดโมของ Arduino ที่แสดงใน link ของ shield ในบทความที่ผ่านมา ซึ่งนั่นรวมถึงการอ่านค่าจาก keys ผ่านทาง ADC โมดูล และการอัพเดทเวลาทุกๆ 1 วินาทีแล้วแสดงผล ซึ่งเดี๋ยวเราจะมาดูกันทีละส่วนครับ

               จาก schematic ของ LCD Keys pad shield เราจะเห็นว่ามีสวิตซ์กด(keys) อยู่ทั้งหมด 6 สวิตซ์ โดย 5 ใน 6 สวิตซ์ต่อเข้ากับวงจรแบ่งแรงดันและแรงดันเอ้าต์พุตต่อเข้ากับ analog input(A0) เพราะจำนวน I/O ของ Arduino มีจำกัดหากต่อแต่ละสวิตซ์เข้า I/O จะต้องใช้ถึง 5 I/O แต่หากใช้ตัวต้านทานต่อเป็นวงจรแบ่งแรงดันร่วมกับ ADC ก็จะลดจำนวน I/O ลงได้มาก ส่วนอีกสวิตซ์จะเป็น RESET ครับ


               สำหรับ Pinguino นั้นมี library สำหรับอ่านค่าจาก ADC โมดูลที่เหมือนกับของ Arduino เป๊ะแถมความละเอียดยังเป็น 10 บิตเท่ากันอีกด้วย นั่นหมายความว่าเราสามารถ copy โค้ดเดโมของ Arduino มาใช้ใน Pinguino ได้เลย ง่ายดีไหมละครับ โดยโค้ดในส่วนการอ่านค่าสวิตซ์จะเป็นดังนี้ครับ

1:  int adc_key_in = 0;  
2:  #define btnRIGHT 0  
3:  #define btnUP   1  
4:  #define btnDOWN  2  
5:  #define btnLEFT  3  
6:  #define btnSELECT 4  
7:  #define btnNONE  5  

8:  int read_LCD_buttons()  
9:  {  
10:   adc_key_in = analogRead(A0);   // read the value from the sensor  
11:   if (adc_key_in < 50)  return btnRIGHT;   
12:   if (adc_key_in < 195) return btnUP;   
13:   if (adc_key_in < 380) return btnDOWN;   
14:   if (adc_key_in < 555) return btnLEFT;   
15:   if (adc_key_in < 790) return btnSELECT;    
16:   return btnNONE; // when all others fail, return this...  
17:  }  


              เริ่มต้นจากการประกาศตัวแปรชื่อ adc_key_in ไว้สำหรับรับค่าจากการอ่านผลลัพธ์ของการแปลง A/D โดยในฟังก์ชัน read_LCD_buttons() จะมีการเรียกใช้ analogRead(A0) ซึ่งจะส่งค่าผลลัพธ์ของการแปลง A/D ของช่อง A0  มาเก็บไว้ในตัวแปรที่กล่าวข้างต้น จากนั้นจึงเปรียบเทียบค่า แล้วส่งผลลัพธ์ที่ถูกต้องกลับไปให้ฟังก์ชัน main ต่อไป โดยผลลัพธ์ที่จะส่งกลับไปก็คือตัวเลขที่ถูก define เอาไว้ก่อนแล้วเพื่อให้ง่ายในการเขียน หรืออ่านโค้ด ส่วนค่าตัวเลขที่นำมาเปรียบเทียบกับค่าที่อ่านจาก ADC นั้นเคยอ่านเจอว่าเจ้าของได้คำนวณ และวัดแรงดันตกคร่อมจริงเพื่อทดสอบ จากนั้นก็มีบวกค่าความคลาดเคลื่อนเข้าไปอีกค่าละประมาณ 50 จึงได้เป็นตัวเลขเหล่านี้ออกมา

             เมื่อมีฟังก์ชันอ่านค่าจากสวิตซ์แล้ว เราก็มาเขียนโค้ดในส่วนของ main(หรือ loop())กัน ซึ่งก็จะเป็นเพียงการเรียกใช้ฟังก์ชัน read_LCD_buttons() แล้วเขียนข้อความออกไปที่จอ LCD ให้ตรงกับสวิตซ์ที่กด( หรือตรงกับค่าที่ได้รับกลับมาหลังจากเรียกใช้ฟังก์ชัน read_LCD_buttons())เท่านั้นเอง โดยโค้ดในส่วนนี้จะเป็นดังนี้นะครับ


1:  lcd_key = read_LCD_buttons(); // read the buttons  
2:   switch (lcd_key)        // depending on which button was pushed, we perform an action  
3:   {  
4:    case btnRIGHT:  
5:     {  
6:     lcd.printf("RIGHT ");  
7:     break;  
8:     }  
9:    case btnLEFT:  
10:     {  
11:     lcd.printf("LEFT  ");  
12:     break;  
13:     }  
14:    case btnUP:  
15:     {  
16:     lcd.printf("UP  ");  
17:     break;  
18:     }  
19:    case btnDOWN:  
20:     {  
21:     lcd.printf("DOWN ");  
22:     break;  
23:     }  
24:    case btnSELECT:  
25:     {  
26:     lcd.printf("SELECT");  
27:     break;  
28:     }  
29:     case btnNONE:  
30:     {  
31:     lcd.printf("NONE ");  
32:     break;  
33:     }  
34:   }  


               อันสุดท้าย  ในตัวอย่างของ Arduino จะเห็นว่ามีตัวเลขที่เพิ่มค่าทุกๆวินาทีแสดงอยู่ด้วย ซึ่งในโค้ดเดโมจะมีการเรียกใช้ฟังก์ชัน millis() ซึ่งจะเป็นฟังก์ชันที่คืนค่าที่เพิ่มขึ้นทุกๆ 1 วินาที( millisecond ) กลับมาให้ เมื่อเราหารค่าทีได้คืนกลับมาด้วย 1000 เราก็จะได้ตัวเลขที่จะแสดงผลทุกๆ 1 วินาที ซึ่งโค้ดก็จะเป็นดังตัวอย่างข้างล่างนี้


1:  lcd.setCursor(9,1);      // move cursor to second line "1" and 9 spaces over  
2:  lcd.printf("%u", millis()/1000);   // display seconds elapsed since power-up  

               เมื่อเราเข้าใจทุกส่วนแล้วเราก็เอามารวมกันก็จะได้เป็นโค้ดเดโมที่ทำงานกับ LCD Keys pad shield ได้เหมือนกับ Arduino ทุกอย่างเลยครับ โค้ดตัวเต็มจะอยู่ข้างล่างนี้นะครับ แล้วลองดูวิดีโอผลลัพธ์การทำงานได้เลยครับ


1:  /*-----------------------------------------------------  
2:  Author: --<Ekkachai Muangrodpai>  
3:  www.picgetstart.blogspot.com  
4:  Date: 2016-07-09  
5:  Board:  Pinguino 8 by Jimmy + LCD Keypads Shield V.1  
6:  Description:  
7:  -Display a message on LCD Keypads Shield, and also read a keys through analog AN0.  
8:  -At the same time, display the second time too.  
9:   * LCD RS pin to digital pin 5  
10:   * LCD E pin to digital pin 4  
11:   * LCD D4 pin to digital pin 24  
12:   * LCD D5 pin to digital pin 18  
13:   * LCD D6 pin to digital pin 17  
14:   * LCD D7 pin to digital pin 16  
15:   * LCD R/W pin to ground  
16:   note:  
17:   - don't use lcd.print() and lcd.printf() in the same program.  
18:  -----------------------------------------------------*/  
19:  #define BACK_LIGHT  2    //LCD back light control by pin2  
20:  // define some values used by the panel and buttons  
21:  int lcd_key   = 0;  
22:  int adc_key_in = 0;  
23:  #define btnRIGHT 0  
24:  #define btnUP   1  
25:  #define btnDOWN  2  
26:  #define btnLEFT  3  
27:  #define btnSELECT 4  
28:  #define btnNONE  5  
29:  // read the buttons  
30:  int read_LCD_buttons()  
31:  {  
32:   adc_key_in = analogRead(A0);   // read the value from the sensor   
33:   if (adc_key_in < 50)  return btnRIGHT;   
34:   if (adc_key_in < 195) return btnUP;   
35:   if (adc_key_in < 380) return btnDOWN;   
36:   if (adc_key_in < 555) return btnLEFT;   
37:   if (adc_key_in < 790) return btnSELECT;    
38:   return btnNONE; // when all others fail, return this...  
39:  }  
40:  void setup( void) {  
41:    // put your setup code here, to run once:  
42:    pinMode(BACK_LIGHT, OUTPUT);  
43:    digitalWrite(BACK_LIGHT, HIGH);  
44:    // initialize the library with the numbers of the interface pins    
45:    lcd.pins(5, 4, 24, 18, 17, 16, 0, 0, 0, 0); // RS, E, D4 ~ D8    
46:    // set up the LCD's number of columns and rows:   
47:    lcd.begin(16, 2);  
48:    // Print a message to the LCD.  
49:    lcd.clear();  
50:    lcd.setCursor(0,0);  
51:    lcd.printf("Push the buttons"); // print a simple message  
52:  }  
53:  void loop( void ) {  
54:   lcd.setCursor(9,1);      // move cursor to second line "1" and 9 spaces over  
55:   lcd.printf("%u", millis()/1000);   // display seconds elapsed since power-up  
56:   lcd.setCursor(0,1);      // move to the begining of the second line  
57:   lcd_key = read_LCD_buttons(); // read the buttons  
58:   switch (lcd_key)        // depending on which button was pushed, we perform an action  
59:   {  
60:    case btnRIGHT:  
61:     {  
62:     lcd.printf("RIGHT ");  
63:     break;  
64:     }  
65:    case btnLEFT:  
66:     {  
67:     lcd.printf("LEFT  ");  
68:     break;  
69:     }  
70:    case btnUP:  
71:     {  
72:     lcd.printf("UP  ");  
73:     break;  
74:     }  
75:    case btnDOWN:  
76:     {  
77:     lcd.printf("DOWN ");  
78:     break;  
79:     }  
80:    case btnSELECT:  
81:     {  
82:     lcd.printf("SELECT");  
83:     break;  
84:     }  
85:     case btnNONE:  
86:     {  
87:     lcd.printf("NONE ");  
88:     break;  
89:     }  
90:   }    
91:  }  


วันพฤหัสบดีที่ 7 กรกฎาคม พ.ศ. 2559

Pinguino กับ LCD Keys pad shield part 1


               วันนี้ผมตั้งใจจะนำเสนอการใช้ Pinguino 8 บอร์ดเชื่อต่อกับจอ LCD โดยผมเลือกที่จะใช้ LCD Keys Pad Shield เพราะความสะดวก สามารถเสียบลงบนตัว Pinguino 8 ได้เลย  หาซื้อได้ง่าย และยังราคาถูกอีกด้วย ผมคิดว่าถูกกว่า และสะดวกกว่า ซื้อแล้วมา wiring สายเองเสียอีกครับ ผู้อ่านหลายๆท่านอาจจะมีอยู่แล้วกับตัวก็ได้ หรือถ้าใครยังไม่มีก็ลอง search หา ลองซื้อมาเล่นดูนะครับ ตัวที่ผมจะใช้จะมีหน้าตาประมาณในรูปข้างล่างนี้เลยครับ


รูปที่ 1 LCD Key pad shield ที่ใช้

คราวนี้เมื่อเราจะใช้งานเจ้า shield ตัวนี้เราก็จำเป็นจะต้องมี schematic รวมถึงตำแหน่งขาที่มันจะเชื่อมต่อกับบอร์ด Pinguino 8 ของเราเสียก่อนจึงจะสามารถเขียนโปรแกรมเพื่อใช้งานมันได้ ซึ่งผมใช้ schematic จากที่นี้ครับ
http://www.dfrobot.com/wiki/index.php?title=Arduino_LCD_KeyPad_Shield_(SKU:_DFR0009)
และอันนี้ก็ diagram ของมันครับ
ซึ่งใน link ข้างบนนั้นนอกจาก schematic แล้วยังมีโค้ดตัวอย่างที่ใช้กับ Arduino ให้อีกด้วยครับ ซึ่งเราสามารถ copy แล้วเอามา modify เพียงเล็กน้อยก็สามารถใช้งานกับบอร์ด Pinguino 8 ได้แล้วครับ

               หลังจากเราได้ schematic กับ pin diagram ของเจ้า LCD Key pad shield มาแล้ว เราก็ต้องมาดูว่าเจ้า Pinguino 8 นั้นมี pin number อะไรบ้างและมีการจัดเรียงบนบอร์ดอย่างไร  อันดับแรกคือ pin number ของ Pinguino ซึ่งใช้ PIC18F45K50 เราสามารถดูได้จาก link ต่อไปนี้ครับ หรือจะดูที่รูปที่ 2 เลยก็ได้ครับ

รูปที่ 2 Pinguino pin number
               จากรูปที่ 2 จะเห็นว่า Pinguino ได้กำหนดขาต่างๆของ PIC18F45K50 ไว้เป็นหมายเลขเพื่อให้เรียกใช้งานได้สะดวกคล้ายกับ Arduino ตัวอย่างเช่น ขา RB0 ก็จะเป็นขาหมายเลข 0 ขา RB1 ก็จะเป็นขาหมายเลข 1
ไล่เรียงกันไป ซึ่งแต่ละขาก็จะมีความสามารถแตกต่างกันไป คราวนี้พอผมเอามาทำเป็นบอร์ด Pinguino 8 แล้วพยายามจัดเรียงขาให้ได้ใกล้เคียงกับ Arduino ตำแหน่งขามันเลยไม่ได้เรียงกันเป็นลำดับเหมือนกับ Arduino ซึ่งอันนี้เป็นสิ่งที่ทำให้สับสนได้ง่ายโดยเฉพาะผู้เริ่มต้น แม้แต่กับตัวผมเองเมื่อแรกเริ่มก็งงจนเขียนโค้ดผิดแล้วงมหาสาเหตุอยู่หลายวันทีเดียว ดังนั้นที่บอร์ด Pinguino 8 ผมจึงมีเขียนหมายเลขกำกับเอาไว้ที่แต่ละขาเพื่อให้ง่ายเวลาใช้งานและเขียนโปรแกรม รูปที่ 3 และรูปที่ 4 แสดงตัวเลขกำกับแต่ละขาครับ

รูปที่ 3 pin number ฝั่ง digital

รูปที่ 4 pin number ฝั่ง analog

ทีนี้เมื่อเราพิจารณา pin diagram และ schematic ของ LCD Key pad shield กับหมายเลขกำกับบนบอร์ด Pinguino 8 ก็จะสามารถสรุปการเชื่อมต่อได้ดังต่อไปนี้ครับ
LCD Shield         Pinguino 8
D4                          24
D5                          18
D6                          17
D7                          16
RS                          5
E                            4
Back light              2
             Keys                       8 หรือ A0
               เมื่อเรารู้หมายเลขขาที่ใช้ในการเชื่อต่อแล้วเราก็สามารถเริ่มเขียนโค้ดเพื่อแสดงข้อความบนจอ LCD ได้แล้วครับ เริ่มต้นจากการ define ขา back light ก่อนเพื่อให้ง่ายในการเขียนโค้ด และ IDE รู้จักและเพิ่มในส่วนออโต้คอมพลีตให้เราด้วย 


 #define BACK_LIGHT  2    //LCD back light control by pin2  

และเราจะกำหนดขา back light ให้เป็นเอ้าต์พุท และสั่งให้เป็น on โดยส่ง logic high ออกไป ด้วยคำสั่ง


 pinMode(BACK_LIGHT, OUTPUT);  
 digitalWrite(BACK_LIGHT, HIGH);  

ถัดมาเราจึงทำการ initialize LCD ด้วยคำสั่ง

 lcd.pins(5,4,24,18,17,16,0,0,0,0);  //RS,E,D4,D5,D6,D7 in 4 bit mode  

ซึ่งค่าพารามิเตอร์ที่ส่งให้ฟังก์ชันจะเป็นหมายเลข I/O ของ Pinguino ที่เชื่อมต่อกับจอ LCD โดยตัวแรกจะเป็นขา RS, E, และตามมาด้วยขาดาต้า D4-D7 ตามลำดับ นี่เป็นในกรณีที่เชื่อมต่อจอ LCD ในแบบ 4 bit mode นะครับดังนั้นพารามิเตอร์ที่เหลือจึงใส่ค่าเป็น 0 สี่ตัว 


ต่อมาเราจำเป็นต้องกำหนดว่า LCD ที่เรากำลังใช้งานอยู่นั้นเป็นชนิดใด 16x2 หรือ 20x4 โดยใช้คำสั่งต่อไปนี้ครับ

 lcd.begin(16,2);              //collumn, row  

เมื่อมาถึงตรงนี้เราก็สามารถเริ่มใช้งานจอ LCD ได้แล้ว โดยผมจะทำการเคลียร์หน้าจอเสียก่อน จากนั้นจึงกำหนดให้เคอร์เซอร์ไปที่ตำแหน่งเริ่มต้นของแถวแรกซึ่งก็คือตำแหน่ง 0,0 แล้วจึงส่งข้อความออกไปแสดงดังตัวอย่างโค้ดข้างล่างนี้ครับ


 lcd.clear();  
 lcd.setCursor(0,0);              //collumn 0, first row  
 lcd.printf("Hello World!....");  

และนี่คือตัวอย่างโค้ดทั้งหมดครับ


1:  /*-----------------------------------------------------  
2:  Author: --<Ekkachai Muangrodpai>  
3:  Date: 2016-07-07  
4:  Board:  Pinguino 8 + LCD Key pad shield v1  
5:  Description: Display 'Hello World!' on LCD  
6:  LCD Shield           Pinguino 8  
7:  D4                   24  
8:  D5                   18  
9:  D6                   17  
10:  D7                  16  
11:  RS                  5  
12:  E                   4  
13:  Back light          2  
14:  -----------------------------------------------------*/  
15:  #define BACK_LIGHT  2    //LCD back light control by pin2  
16:  void setup() {  
17:    // put your setup code here, to run once:  
18:    pinMode(BACK_LIGHT, OUTPUT);  
19:    digitalWrite(BACK_LIGHT, HIGH);  
20:    lcd.pins(5,4,24,18,17,16,0,0,0,0);  //RS,E,D4,D5,D6,D7 in 4 bit mode  
21:    lcd.begin(16,2);              //collumn, row  
22:    lcd.clear();  
23:    lcd.setCursor(0,0);              //collumn 0, first row  
24:    lcd.printf("Hello World!....");  
25:  }  
26:  void loop() {  
27:    // put your main code here, to run repeatedly:  
28:  }  

เพิ่มเติม